
 |
MAINTENANCE PROCEDURES FOR FERRITE HEADS MAINTENANCE PROCEDURES FOR FERRITE HEADS
Dale Manquen Joe Martinson
Electrical & Computer Engineering Martinsound Studio
California State University, Northridge Alhambra, CA
Presented at the AES 63rd Convention May 15-18, 1979 Preprint #1508
Modified July 1999
Ferrite heads have been steadily growing in popularity in the professional audio field for the last ten years. Beginning with high-speed tape duplicator application, ferrite has worked its way into the high-end consumer market and the top line professional market. Table 1 list some of the advantages and disadvantages of ferrite, but by far the greatest selling point has been long life - typically ten times the life of conventional laminated metal heads. This advantage, however, vanishes if the head experiences gap chipping or erosion that produces premature catastrophic head failure. This paper deals with methods of diagnosing ferrite gap chipping by studio maintenance personnel to avoid catastrophic failure.
Table 1
Advantages
Hard material = long wear
Low eddy current loss
Excellent gap alignment
Disadvantages
Gap chipping
More expensive (difficult to manufacture)
Lower permeability and saturation flux level than metal
The authors first encountered ferrite head failures approximately two years ago. Since that time, the number of opportunities to diagnose head failures has risen sharply as more machines are sold and older machines acquire more operating hours. Our data indicates that not all ferrite heads are created equal since some approach ten times the life of normal metal heads and others fail long before the equivalent metal head. Lest we cast an unwarranted gloom over all ferrite heads, let us note that some manufacturers have a very high yield of long-life heads. Our intent is only to emphasize the need for regularly scheduled preventive maintenance when dealing with ferrite heads.
A closer look at the nature of ferrite shows that its hardness is accompanied by brittleness due to the crystalline ferrite structure that is somewhat akin to ice. Visualize for a moment what happens to ice cubes when they are pounded to make crushed ice for a cocktail. The sharp edges of the cubes fracture into small pieces, leaving behind jagged edges. Because of this chipping nature we are able to produce crushed ice rather than 'snow'.
A ferrite head has square corners at the gap of the head. If no support for these corners is provided, they will crumble under the abrasive load of the tape. This problem is averted by adding a glass spacer in the gap that is fused into the pores of the ferrite to produce a solid ferrite-glass-ferrite sandwich that resists chipping.
Why do some units fail? The major cause is poor ferrite material. Not all ferrite can survive the abuse received by a magnetic head. Some manufacturers seem to know how to produce more durable materials using both single crystal ferrites and hot pressed ferrites. Contributing factors are poor design, such as unequal coefficients of thermal expansion, or inadequate process control that leads to breakdown of the sandwich. What is the solution? Manufacturers can go back to the drawing boards or use tighter quality control, but the customer has only two options - replace or relap the head. Relapping the head restores the gap by removing the jagged edges, but it also decreases the life of the head. Will the gap crumble again? Our data indicates that if this defect is common in a given brand and model, the gap will fail again. If, however, the cause was a rare surface defect, removal of the defect by lapping may yield a long-life head.
DIAGNOSIS OF PERFORMANCE
Having stated the cause and cure, we can now tackle the problem of evaluating the heads. Our examinations started with a 30X binocular metallurgy microscope. The ragged nature of the gap was readily apparent, but no permanent record could be made. Fair results were obtained with a 100X microscope with a 35mm camera attachment, but the external illumination source did not yield good definition of the shapes of the voids. The ultimate optical method was a microscope/television camera/monitor system with through-the-lens illumination. This system provided good definition of the plan view of the voids, but no depth information.
The television monitor included an electronic graticle for digital distance measurements. This device indicated that some areas of the gap widened to ten times the normal value, but other areas were intact.
The purpose of exploring these visual methods of examining gap erosion was to provide insight as to what would be a reasonable mathematical model for gap erosion. If our playback tests on these heads correlated with the severity of the visually observed erosion, we would then have a more practical test for studio use. After all, how many studios have expensive TV microscopes? Pinball machines and Jacuzzis are more important!
The test procedure to determine relative degradation of playback gap performance is quite straightforward and by no means new. First, the playback equalization of the test machine, in this case and Ampex ATR-100, is adjusted using an equalized flux loop. A standard alignment tape, preferably at a low speed such as 7.5 ips, is played back and the deviation from the flux loop response noted. If the same transport is used for all measurements, the flux loop and test tape are accurate, and the head azimuth correctly peaked, the differences from track to track and head to head are due to gap width loss and spacing loss. (As a note of caution, we saw 2 dB errors due to old test tapes versus new test tapes. Any test tape can be used for relative comparisons, but long-term repeatability, as needed later in this paper, requires a trustworthy test tape.)
The results of these tests are then plotted on log paper (Curve 1) to show the shape of the response curve. (Attempts to use the raw tabular data were quite unsatisfactory.) Only frequencies above the fringing range are required - 1 kHz and above at 7.5 ips.
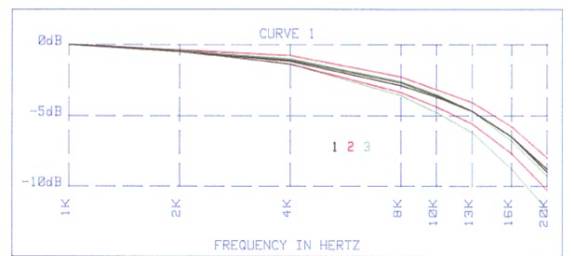
Figure 1. Test data from 3 stereo machines at 7.5 ips (red, green, and black pairs)
A MATHEMATICAL MODEL
Our next step was to develop a mathematical model to use for simulating the loss phenomena. Since the state of erosion along the length of a single track varied from pristine to 10 times normal width for some heads, a function describing the erosion should include a distribution of gap widening. The simplest model is a uniform wedge, described in our case by an erosion factor K, which is the additional width of the gap due to erosion, expressed in units of nominal gap width. Thus K=0 implies no widening and K=9 indicates a maximum total gap width of 10 times normal. For spacing loss calculations, the gap is assumed to deepen as it widens, producing a spacing loss related to the depth.
The loss models of
55d/l dB for spacing loss and
20 log sin pGe/l dB for gap width loss up to 10 dB,
pGe/l
where l is wavelength on tape, d is spacing between head and tape, and Be is effective gap length. In this analysis the effective gap is taken equal to the measured gap of 100 microinches since empirical data indicates that ferrite may not suffer the edge losses due to stress that yield a typical correction factor of 10% wider effective gap for metal heads.
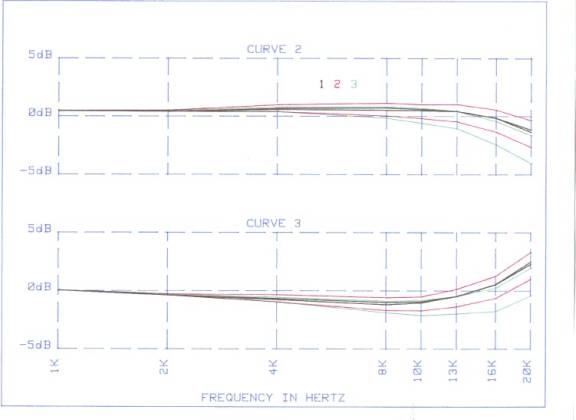
These loss expressions created by the wedge-shaped gap were programmed on a HP 9845 computer using numerical integration with 100 steps across the track. Each of the losses was compared with the alignment tape data and the error plotted. The shapes of these plots indicate that neither spacing (Curve 2) nor widening (Curve 3) is solely responsible for the observed errors.
Next the loss expressions were coupled together using the slope of the sides of the wedge. The model was further simplified as a step type gap where the effective gap depth is 1/2 the deepest point and the effective width is the width at half the depth.
With this model, variation of K and Q permits examining various combinations of spacing and widening. For the test data, values of K and Q that achieved less than .2 dB error from 1 kHz to 20 kHz for both tracks of our sample #1 are show in Curve 4 applied to 3 stereo heads. The correction is not exact for the other two heads, but does appear to be a good average value for the 6 tracks.
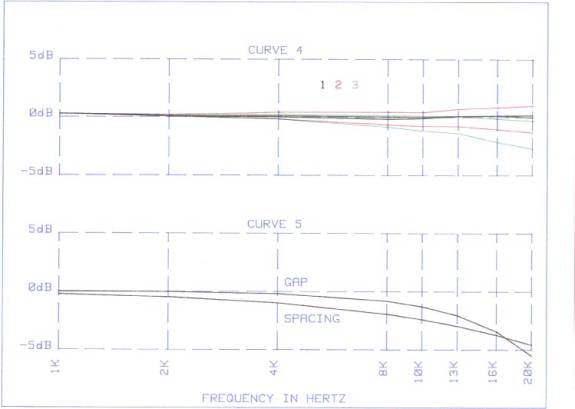
Curve 5 shows the amounts of gap widening and spacing corrections that are applied in Curve 4 to the test data. At 20 kHz roughly 5 dB of correction is added for each loss mechanism.
The intent of this model is not to claim a thorough understanding of ferrite gap erosion phenomenon. It only illustrates that using very simple assumptions, a good fit can be achieved. Others can argue for exponential or Gaussion gap widening, sinusoidal or exponential slope shapes, and so forth. Our model shows the obvious - the gap is falling apart.
RECOMMENDATIONS
Our recommendations are simple. First, buy a microscope if you do not have a microscope on a disc cutting lathe available. Even a phonograph stylus microscope is better than bare eyes. Second, build and learn to use a simple equalized flux loop. Third, using an equalized flux loop and a slow-speed test tape, write down the measured losses of the machine when the machine is new. File this information in a safe place for later use. Fourth, periodically recheck the performance with the flux loop and test tape and look at the gap with the microscope. Any significant drops in performance are a tip-off to gape erosion. The gap does not fall apart overnight, so you have time to correct the problem if you spot it early.
Response tests were conducted on record heads in the reproduce mode with somewhat similar results, but since the recording occurs at the trailing edge of the gap, a ragged gap will create different problems that require a new model. Gap erosion can be diagnosed in the same manner, but the amount of actual signal degradation during recording remains unknown.
SCANNING ELECTRON MICROSCOPE (SEM) PHOTOGRAPHS
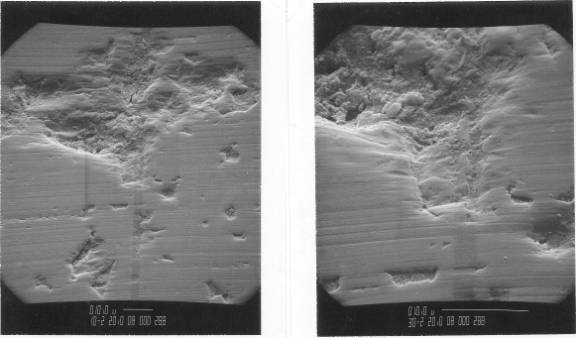
All of the above modeling was based upon intuition and the optical microscope photographs. Just prior to the publication deadline we were able to obtain scanning electron microscope photographs which show startling three-dimensional detail confirming our assumptions regarding the contour of the erosion boundaries. In addition, crystal pullouts are obvious on the SEM photographs.
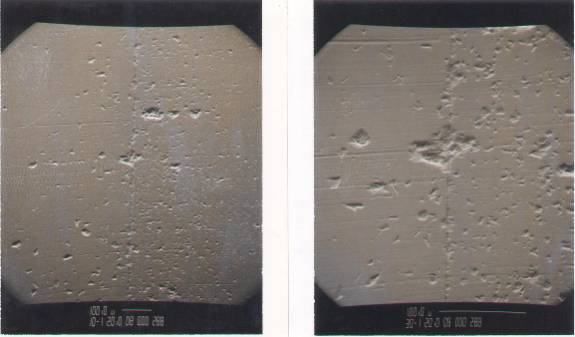
100X 300X
1000X 3000X
The SEM photos produced two unexpected bits of information. First, the left and right halves of some of the heads appear to have dissimilar crystalline structures, indicating that the ferrite material being used is somewhat inconsistent. Second, the gap appears to be formed by depositing glass onto the two core half-shells and then attempting to fuse the two halves together. The SEM photographs how areas where half of this glass 'sandwich' has eroded much faster than normal, creating a depression of half the nominal gap width. This indicates the fusing is incomplete or the glass is of inconsistent hardness.
ACKNOWLEDGEMENTS
We would like to acknowledge the assistance of Saki Magnetics (whose heads are not the subject of this report) for the use of their TV microscope, Marshall Nathanson of Burroughs Corporation Westlake Village, CA, for the SEM photography, Righ Greenhalgh for developing and printing the slides and photographs, and Deane Jensen for providing plotter facilities for the final graphs.